
概要
パッケージ go_router を用いて画面遷移する方法を備忘録としてまとめます。ルビーdogさんの動画を参考にしています。
全体像
以下のような流れで画面遷移を作ることができます。
- go_routerをインストールする
- 画面のクラスを定義する
- アプリ全体のクラスでgo_routerによる画面遷移のルールを定義する
go_routerをインストールする
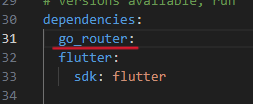
Flutterプロジェクト直下にある pubspec.yaml を編集します。具体的には、以下の画像の赤線部分のように、dependencies に go_router を追加します。
画面のクラスを定義する
画面のクラスを定義します。main.dart と同じ階層に page1.dart, page2.dart を作成し、内容を以下のようにします。
page1.dartimport 'package:flutter/material.dart';
import 'package:go_router/go_router.dart';
class Page1 extends StatelessWidget {
const Page1({super.key});
// 画面2に進む処理
void push(BuildContext context) {
context.push('/2');
}
@override
Widget build(BuildContext context) {
// 画面上部のバー部分
final appBar = AppBar(
backgroundColor: Colors.yellow,
title: const Text('画面1'),
);
// 進むボタン
final pushButton = ElevatedButton(
onPressed: () => push(context),
style: ElevatedButton.styleFrom(backgroundColor: Colors.yellow),
child: const Text('進む'),
);
return Scaffold(
appBar: appBar,
body: Center(
child: Row(
mainAxisAlignment: MainAxisAlignment.center,
children: [
pushButton,
],
),
),
);
}
}
page2.dartimport 'package:flutter/material.dart';
import 'package:go_router/go_router.dart';
class Page2 extends StatelessWidget {
const Page2({super.key});
// 画面1に戻る処理
void back(BuildContext context) {
context.pop();
}
@override
Widget build(BuildContext context) {
// 画面上部のバー部分
final appBar = AppBar(
backgroundColor: Colors.cyan,
title: const Text('画面2'),
);
// 戻るボタン
final backButton = ElevatedButton(
onPressed: () => back(context),
style: ElevatedButton.styleFrom(backgroundColor: Colors.cyan),
child: const Text('戻る'),
);
return Scaffold(
appBar: appBar,
body: Center(
child: Row(
mainAxisAlignment: MainAxisAlignment.center,
children: [
backButton,
],
),
),
);
}
}
page1.dart では画面を進める処理として、context.push('$遷移先パス')が使われています。page2.dart では画面を戻す処理としてcontext.pop()が使われています。今は2画面のみの画面遷移を考えているので出てきていませんが、3画面以上の画面からなるアプリで、例えば「画面1から画面3に遷移する」といった画面遷移を考えるときにはcontext.go('$遷移先パス')が使えるとのことです。
それと、いずれのファイルでもimport 'package:go_router/go_router.dart';の一文を先頭に書き足すのを忘れないようにしましょう。
アプリ全体のクラスでgo_routerによる画面遷移のルールを定義する
先程作成した page1.dart, page2.dart と go_router のパッケージをインポートし、アプリ全体のクラス(ここではMyAppクラス)を次のように書きます。
main.dartimport 'package:flutter/material.dart';
import 'package:go_router/go_router.dart';
import 'package:test/page1.dart';
import 'package:test/page2.dart';
void main() {
runApp(MyApp());
}
class MyApp extends StatelessWidget {
MyApp({super.key});
final router = GoRouter(
// アプリ起動時の画面を指定するパス
initialLocation: '/1',
// パスと画面の組み合わせ
routes: [
GoRoute(
path: '/1',
builder: (context, state) => Page1(),
),
GoRoute(
path: '/2',
builder: (context, state) => Page2(),
),
]);
@override
Widget build(BuildContext context) {
return MaterialApp.router(
routeInformationProvider: router.routeInformationProvider,
routeInformationParser: router.routeInformationParser,
routerDelegate: router.routerDelegate,
);
}
}
ポイントは2点です。1点目は、
final router = GoRouter(
// アプリ起動時の画面を指定するパス
initialLocation: '/1',
// パスと画面の組み合わせ
routes: [
GoRoute(
path: '/1',
builder: (context, state) => Page1(),
),
GoRoute(
path: '/2',
builder: (context, state) => Page2(),
),
]);
の部分。routes のリストの要素である GoRoute のそれぞれがパス(path)と画面(builder)の組み合わせの定義を表します。path では画面を表すパスを引数として書き、builder では(context, state) => Xxxx()の形でどのクラスによって画面を作るかを指定します(Xxxx は画面を定義するクラス)。2点目は
return MaterialApp.router(
routeInformationProvider: router.routeInformationProvider,
routeInformationParser: router.routeInformationParser,
routerDelegate: router.routerDelegate,
);
の部分。go_router を使う場合、この部分は以上のような決まった書き方をするとのこと。コピペで使いまわせばいいですね。
まとめ
go_router を用いた画面遷移について備忘録としてまとめました。